Tuesday, July 7, 2015

RHEL Logical Volume Manager - Increasing/Decreasing Size

LVM, logical volumes size can be increased or decreased depends on our needs. Logical volume can be shirked/reduced using “lvreduce” command but this will not reduce the filesystem. You need to reduce the filesystem before reducing the logical volume. Logical volume can be extended/increased using “lvextend” command.Once you have extended the logical volume ,then you need to increase the filesystem to the see new space on the mount points.
Most of the Linux/Unix beginners will confuse with term ‘volume’ and ‘filesystem’. Volume is a raw partition like a physical disk.In a order to store data on volume,you need a filesystems on that.(Ex:ext2,ext3,ext4…etc..)


1.Extending the Logical Volume size

Logical volumes can be increased on fly without un-mounting the filesystem. Here we will see how to increase the linear filesystem and volume on Redhat Linux 6.
1.Check the volume group free space before proceeding to the volume expansion.
[root@mylinz ~]# vgs
  VG        #PV #LV #SN Attr   VSize  VFree
  uavg        3   1   0 wz--n-  5.99g 5.89g
  vg_mylinz   1   2   0 wz--n- 19.51g    0
[root@mylinz ~]#
#
From the above output ,we can see volume group “uavg” has 5.89GB free space.


2.We are planning to extend volume “lvol0″ from uavg volumegroup. 
[root@mylinz ~]# lvs
  LV      VG        Attr   LSize   Origin Snap%  Move Log Copy%  Convert
  lvol0   uavg      -wi-ao 100.00m
  lv_root vg_mylinz -wi-ao  16.54g
  lv_swap vg_mylinz -wi-ao   2.97g
[root@mylinz ~]# df -h /vol1/
Filesystem            Size  Used Avail Use% Mounted on
/dev/mapper/uavg-lvol0
                       97M  5.6M   87M   7% /vol1
[root@mylinz ~]# lvdisplay /dev/uavg/lvol0
  --- Logical volume ---
  LV Name                /dev/uavg/lvol0
  VG Name                uavg
  LV UUID                0rtjKO-3GdM-CeOf-CY8m-fZgH-wjgu-kJivtd
  LV Write Access        read/write
  LV Status              available
  # open                 1
  LV Size                100.00 MiB
  Current LE             25
  Segments               1
  Allocation             inherit
  Read ahead sectors     auto
  - currently set to     256
  Block device           253:2

[root@mylinz ~]#

3.Extend the logical volume by 100MB.
[root@mylinz ~]# lvextend -L +100M /dev/uavg/lvol0
  Extending logical volume lvol0 to 200.00 MiB
  Logical volume lvol0 successfully resized
[root@mylinz ~]# lvdisplay /dev/uavg/lvol0
  --- Logical volume ---
  LV Name                /dev/uavg/lvol0
  VG Name                uavg
  LV UUID                0rtjKO-3GdM-CeOf-CY8m-fZgH-wjgu-kJivtd
  LV Write Access        read/write
  LV Status              available
  # open                 1
  LV Size                200.00 MiB
  Current LE             50
  Segments               1
  Allocation             inherit
  Read ahead sectors     auto
  - currently set to     256
  Block device           253:2

[root@mylinz ~]#

4.Check the mountpoint “/vol1″ .The new space is not be reflected there because,Since you didn’t resize the filesystem.
[root@mylinz ~]# df -h /vol1/
Filesystem            Size  Used Avail Use% Mounted on
/dev/mapper/uavg-lvol0
                       97M  5.6M   87M   7% /vol1
[root@mylinz ~]#

5.Increase the filesystem.
[root@mylinz ~]# resize2fs /dev/uavg/lvol0
resize2fs 1.41.12 (17-May-2010)
Filesystem at /dev/uavg/lvol0 is mounted on /vol1; on-line resizing required
old desc_blocks = 1, new_desc_blocks = 1
Performing an on-line resize of /dev/uavg/lvol0 to 204800 (1k) blocks.
The filesystem on /dev/uavg/lvol0 is now 204800 blocks long.

[root@mylinz ~]#

6.Check the mountpoint now.
[root@mylinz ~]# df -h /vol1
Filesystem            Size  Used Avail Use% Mounted on
/dev/mapper/uavg-lvol0
                      194M  5.6M  179M   3% /vol1
[root@mylinz ~]#
Wow..We have successfully increased the vol1 from 100MB to 200MB.
The same way you can increase any type of volume layouts.

2.Reducing the Logical Volume size

Volumes can’t be  reduced on the fly.To reduce the volume ,
1. umount the filesystem
2. Reduce the filesystem size 
3. Reduce the logical volume
4. Mount the volume .


Here we will see how to reduce the volume “lvol0″ which is part of volume group “uavg” .

1.List he volume information.
[root@mylinz ~]# lvs
  LV      VG        Attr   LSize   Origin Snap%  Move Log Copy%  Convert
  lvol0   uavg      -wi-ao 200.00m
  lv_root vg_mylinz -wi-ao  16.54g
  lv_swap vg_mylinz -wi-ao   2.97g
[root@mylinz ~]# lvdisplay /dev/uavg/lvol0
  --- Logical volume ---
  LV Name                /dev/uavg/lvol0
  VG Name                uavg
  LV UUID                0rtjKO-3GdM-CeOf-CY8m-fZgH-wjgu-kJivtd
  LV Write Access        read/write
  LV Status              available
  # open                 1
  LV Size                200.00 MiB
  Current LE             50
  Segments               1
  Allocation             inherit
  Read ahead sectors     auto
  - currently set to     256
  Block device           253:2

[root@mylinz ~]# df -h /vol1
Filesystem            Size  Used Avail Use% Mounted on
/dev/mapper/uavg-lvol0
                      194M  5.6M  179M   3% /vol1
[root@mylinz ~]#

2.un-mount the filesystem.
[root@mylinz ~]# umount /vol1
[root@mylinz ~]#

3.Reduce the filesystem by 100MB. The current filesystem size is 200MB.
Option 100MB – Final size of the volume.
[root@mylinz ~]# resize2fs /dev/uavg/lvol0 100M
resize2fs 1.41.12 (17-May-2010)
Please run 'e2fsck -f /dev/uavg/lvol0' first.
[root@mylinz ~]#
“resize2fs” required to check the filesystem consistency before reduce the FS.
[root@mylinz ~]# e2fsck -f /dev/uavg/lvol0
e2fsck 1.41.12 (17-May-2010)
Pass 1: Checking inodes, blocks, and sizes
Pass 2: Checking directory structure
Pass 3: Checking directory connectivity
Pass 4: Checking reference counts
Pass 5: Checking group summary information
/dev/uavg/lvol0: 11/49400 files (9.1% non-contiguous), 11884/204800 blocks
[root@mylinz ~]# resize2fs /dev/uavg/lvol0 100M
resize2fs 1.41.12 (17-May-2010)
Resizing the filesystem on /dev/uavg/lvol0 to 102400 (1k) blocks.
The filesystem on /dev/uavg/lvol0 is now 102400 blocks long.
[root@mylinz ~]#
We have successfully reduced  the filesystem to 100MB.

4.De-activate the volume.
[root@mylinz ~]# lvchange -an /dev/uavg/lvol0

5.Reduce the volume. “-L” – Final size of the volume.
Here i am giving volume final size as 104MB. So that  volume may have some room and  won’t touch the filesystem part.The extra 4MB can be recovered using resize2fs. Its up to you how you want to proceed.
Note:You can also give 100MB. For safer side, its better to give some extra space on the volume level.
Having good backup is recommeded before proceeding to volume resize.
[root@mylinz ~]# lvreduce -L 104M /dev/uavg/lvol0
Do you really want to reduce lvol0? [y/n]: y
  Reducing logical volume lvol0 to 104.00 MiB
  Logical volume lvol0 successfully resized
[root@mylinz ~]#

6.Activate the volume and Mount it.
[root@mylinz ~]# lvchange -ay /dev/uavg/lvol0
[root@mylinz ~]# mount -t ext4 /dev/uavg/lvol0 /vol1
[root@mylinz ~]# df -h /vol1
Filesystem            Size  Used Avail Use% Mounted on
/dev/mapper/uavg-lvol0
                       97M  5.6M   87M   6% /vol1
[root@mylinz ~]#


Hope now you are familiar with volume re-sizing operation on Logical volume manager.

Monday, July 6, 2015

RHEL Package Management

Package management is one of the important task in Linux Administration.Red Hat Package manager aka RPM provides robust package administration on Redhat Linux.It eliminates the manually building software and made the software installation & maintenance  much easier than before. RPM has lot of front-end tools to resolve the dependencies to install any packages. In this article ,we will see about RPM package manager’s interview questions and Front end tool “yum” related interview questions. RPM&YUM are commonly used in Redhat Linux Environments. 


RPM Package Management 

1. How to check the installed software(rpm’s) on Redhat Linux ?
Answer: rpm -qa package_name (or) rpm -qa |grep package_name*
Ex:
[root@mylinz ~]# rpm -qa yum
yum-3.2.27-14.el6.noarch
[root@mylinz ~]# rpm -qa |grep yum
yum-rhn-plugin-0.9.1-5.el6.noarch
yum-utils-1.1.26-11.el6.noarch
yum-metadata-parser-1.1.2-14.1.el6.x86_64
yum-3.2.27-14.el6.noarch
PackageKit-yum-0.5.8-13.el6.x86_64
PackageKit-yum-plugin-0.5.8-13.el6.x86_64
[root@mylinz ~]#
2. How to install  specific software package using rpm command on Redhat Linux ?
Answer: rpm –ivh package_name 

3. How to remove the software package from on Redhat  Linux ?
Answer: rpm -ev package_name

4.How to upgrade the existing Redhat package using rpm command ?
Answer: rpm -Uvh package_name

5.How to display the list of installed software package’s files ?
Answer: rpm -ql package_name 
Ex:[root@mylinz ~]# rpm -ql yum-rhn-plugin-0.9.1-5.el6.noarch
/etc/yum/pluginconf.d/rhnplugin.conf
/usr/share/doc/yum-rhn-plugin-0.9.1
/usr/share/doc/yum-rhn-plugin-0.9.1/LICENSE
/usr/share/locale/ar/LC_MESSAGES/yum-rhn-plugin.mo
/usr/share/locale/as/LC_MESSAGES/yum-rhn-plugin.mo
/usr/share/locale/bg/LC_MESSAGES/yum-rhn-plugin.mo
/usr/share/locale/bn/LC_MESSAGES/yum-rhn-plugin.mo
6. How to get the installed software information like package version and short description of package ?
Answer: rpm -qi package_name
Ex:
[root@mylinz ~]# rpm -qi yum-rhn-plugin-0.9.1-5.el6.noarch
Name        : yum-rhn-plugin               Relocations: (not relocatable)
Version     : 0.9.1                             Vendor: Red Hat, Inc.
Release     : 5.el6                         Build Date: Fri 14 May 2010 07:18:35 PM IST
Install Date: Fri 01 Jun 2012 02:41:19 AM IST      Build Host: x86-003.build.bos.redhat.com
Group       : System Environment/Base       Source RPM: yum-rhn-plugin-0.9.1-5.el6.src.rpm
Size        : 178193                           License: GPLv2
Signature   : RSA/8, Tue 17 Aug 2010 02:05:09 AM IST, Key ID 199e2f91fd431d51
Packager    : Red Hat, Inc. 
URL         : https://fedorahosted.org/spacewalk
Summary     : RHN support for yum
Description :
This yum plugin provides support for yum to access a Red Hat Network server for
software updates.
[root@mylinz ~]#
7.How to find files belongs to which rpm package ?
Answer:rpm -qf file_location  
Ex:
[root@mylinz ~]# rpm -qf /etc/yum.conf
yum-3.2.27-14.el6.noarch
[root@mylinz ~]#
8.How to display list of configuration files for specific package ?
Answer:rpm -qc package_name
Ex:
[root@mylinz ~]# rpm -qc yum
/etc/logrotate.d/yum
/etc/yum.conf
/etc/yum/version-groups.conf
[root@mylinz ~]#
9.How to display a list of recently installed software ?
Answer:rpm -qa –last
Ex:
[root@mylinz ~]# rpm -qa --last |head
lvm2-cluster-2.02.72-8.el6                    Tue 06 Aug 2013 11:56:50 AM IST
tigervnc-server-1.0.90-0.10.20100115svn3945.el6 Wed 01 May 2013 08:39:24 PM IST
oracle-xe-11.2.0-1.0                          Tue 26 Jun 2012 01:49:05 PM IST
firefox-3.6.9-2.el6                           Tue 19 Jun 2012 02:31:03 PM IST
redhat-bookmarks-6-1.el6                      Tue 19 Jun 2012 02:30:59 PM IST
10.How to get the list of dependencies for specific rpm file ?
Answer:rpm -qpR rpm_file
Ex:
[root@mylinz ~]# rpm -qpR nautilus-sendto-2.28.2-3.el6.x86_64.rpm
/bin/sh
/bin/sh
/bin/sh
GConf2
GConf2
GConf2
libORBit-2.so.0()(64bit)
libatk-1.0.so.0()(64bit)
libbonobo-2.so.0()(64bit)
libbonobo-activation.so.4()(64bit)
11.How to get the list of dependencies for specific package ?
Answer:rpm -qR package_name
Ex:
[root@mylinz ~]# rpm -qR yum
/usr/bin/python
config(yum) = 3.2.27-14.el6
pygpgme
python >= 2.4
python(abi) = 2.6
python-iniparse
python-sqlite
python-urlgrabber >= 3.9.0-8
rpm >= 0:4.4.2
rpm-python
rpmlib(CompressedFileNames) <= 3.0.4-1
rpmlib(FileDigests) <= 4.6.0-1
rpmlib(PartialHardlinkSets) <= 4.0.4-1
rpmlib(PayloadFilesHavePrefix) <= 4.0-1
yum-metadata-parser >= 1.1.0
rpmlib(PayloadIsXz) <= 5.2-1
[root@mylinz ~]#
12.How to remove the package without checking the dependencies on Redhat Linux ?
Answer:rpm -ev –nodeps package_name

Yum – The RPM front-End tool – Interview Questions

1.What is yum  ?
Answer: yum is yellow update manager which is a front end tool for package management.
All the rpm commands activity can be carried out using yum command in automated way.
Yum mechanism will automatically resolve the dependencies unlike rpm commands.
2.How to install packages using yum ?
Answer:yum install package_name

3.How to configure yum repository in Redhat Linux ?
Answer:Here is the step by step guide

4.How to update the package using yum ?
Answer:yum update package_ name

5.How to search the package in yum ?
Answer:yum search package_name

6.How to remove the package using yum ?
Answer:yum remove package_name

7.How to check the updates for yum repository ?
Answer:yum check-update

8.How to update the yum repo ?
Answer:yum update

9.How to get the package information using yum ?
Answer:yum info package_name

10.How to list the installed packages on Redhat linux using yum  command ?
Answer:yum list installed

11.How to know the particular files belongs to which package ?
Answer:yum provides file_path
Ex:
[root@mylinz ~]# yum provides /etc/yum.conf
Loaded plugins: refresh-packagekit, rhnplugin
This system is not registered with RHN.
RHN support will be disabled.
yum-3.2.27-14.el6.noarch : RPM installer/updater
Repo        : local-installation
Matched from:
Filename    : /etc/yum.conf

yum-3.2.27-14.el6.noarch : RPM installer/updater
Repo        : installed
Matched from:
Other       : Provides-match: /etc/yum.conf
12.How to list the enabled repositories ?
Answer:yum repolist 

Solaris ZONES/Containers Knowledge ( Basics & Advanced )

Basics

Whats the difference between a whole root zone and a sparse root zone ?
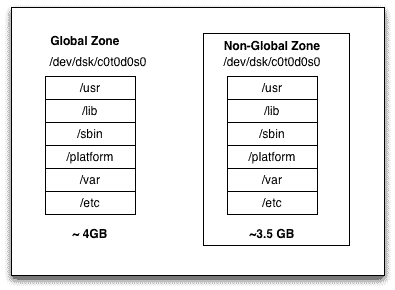
Whole root zone
– Gets its own writable copy of all file systems. Thus installation takes longer time than the sparse root zone.
whole root zone (big zone)
– Also called as big zone.
– Bigger disk footprint, thus consumes more disk space
– To create a Whole root zone we use the option -b with create sub-command :
# zonecfg -z zone01
zonecfg:zone01> create -b
Sparse root zone
– critical file systems like /usr, /lib, /etc, /platform etc are inherited from the global zone to the non-global zone as a read-only loopback file system. Thus installation is quick compared to a whole root zone.
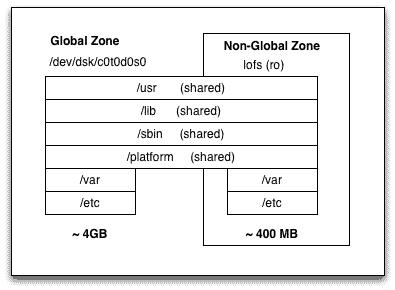
sparse root zone (small zone)
– Also called as small zone
– The default zone type.
– small disk footprint, thus consumes less disk space.

What’s a branded zone ?

BrandZ framework extends the Solaris zones infrastructure, by creating brands. Brands enable creation of non-native operating environments in the zones. For example having a Solaris 8 or Solaris 9 zone on a Solaris 10 global zone. Or having Solaris 10 zone on Solaris 11.

What are the zone daemons/processes and their functions ?

zoneadmd – It is responsible for zone booting and shutting down.There is one zoneadmd process running for each active (ready, running or shutting down) zone on the system.
zsched – Every active zone has an associated kernel process, zsched. Kernel threads doing work on behalf of the zone are owned by zsched.

How to login to a non-global zone ?

To login to a non-global zone :
# zlogin [zone_name]
To login into the console of non-global zone :
# zlogin -C [zone_name]
To login into a zone in safe mode :
global # zlogin -S zone

How to identify whether the zone is global zone or non-global zone ?

pkgcond command comes handy to identify the global or non-global zone. On a global zone when you run the commands :
global # pkgcond is_nonglobal_zone
global # echo $?
1
global # pkgcond is_global_zone
global # echo $?
0
Here the exit code for pkgcond is_global_zone command is 0 (successful) implying that it is a global zone.
Similarly, on a non-global zone :
# pkgcond is_nonglobal_zone
non-global # echo $?
0
non-global # pkgcond is_global_zone
non-global # echo $?
1
Here the exit code status 0 (success) for the command pkgcond is_global_zone implies that it is a non-global zone.

How to identify whether the zone is whole root or sparse root zone ?

Similar to the question above we can find whether the zone is whole root zone or a sparse root zone using the pkgcond command.
# pkgcond is_whole_root_nonglobal_zone
# echo $?
0       -----> (implies that it is a whole root zone)
# pkgcond is_sparse_root_nonglobal_zone
# echo $?
0       -----> (implies that it is a sparse root zone)

How to boot/reboot and halt a non-global zone ?

To boot a zone :
global # zoneadm -z [zone] boot
To reboot a zone :
global # zoneadm -z [zone] reboot
To halt a zone :
global # zoneadm -z [zone] halt
To boot a zone in single-user mode :
global # zoneadm -z [zone] boot -s

How to get a non-global zone’s configuration ?

To get a non-global zone’s configuration details :
global # zonecfg -z [zone] info

How to get performance statistics on zone ?

To get performance statistics on all the zones :
global # prstat -Z
To get performance statistics on a specific zone :
global # prstat -Z [zone]

How to uninstall and delete a non-global zone ?

To uninstall a halted zone :
global # zoneadm -z zone uninstall -F
To delete an uninstalled zone :
global # zoneadm -z zone delete -F

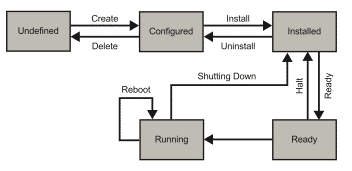
What are the various zone states and their meaning ?

Solaris zone states
Zone stateDescription
undefinedzone’s configuration is not complete and committed. This also occurs when zone’s configuration is deleted
configuredzone’s configuration is completed and committed.
incompleteTranslational state. state during install or uninstall operation.
installedThe zone configuration is completed and required packages are installed under zone’s root path
readyKernel creates the zsched process, network interfaces are plumbed and file systems are mounted and devices configured. A zone ID is assigned. But no process other than zsched is started at this stage.
runninguser process associated with zone application environment are running.
shutting down and downTransitional states while zones are shutting down.

Where is zone’s configuration saved ?

The zone’s configuration is saved under /etc/zones as a XML file with zone’s name. For example zone01 would have a configuration saved as :
# /etc/zones/zone01.xml

Resource management in zones

How to add VxVM file system or raw volume to a non-global zone ?

To add a VxVM file system to a non-global zone :
global # zonecfg -z zone01
zonecfg:zone01> add fs
zonecfg:zone01:fs> set type=vxfs
zonecfg:zone01:fs> set special=/dev/vx/dsk/datadg/datavol
zonecfg:zone01:fs> set raw=/dev/vx/rdsk/datadg/datavol
zonecfg:zone01:fs> set dir=/data
zonecfg:zone01:fs> end
zonecfg:zone01> commit
zonecfg:zone01> verify
zonecfg:zone01> exit
To add a VxVM raw volume to a non-global zone :
global# zonecfg -z zone01
zonecfg:zone01> add device
zonecfg:zone01:device> set match=/dev/vx/rdsk/dg1/vol1
zonecfg:zone01:device> end
zonecfg:zone01> commit
zonecfg:zone01> verify
zonecfg:zone01> exit

How to delegate ZFS dataset to a non-global zone ?

When we delegate a dataset to a non-global zone we can do any operation on that dataset inside of the zone without requiring global zone to configure it all the time.
zonecfg:zone01> add dataset
zonecfg:zone01> set name=tank/sales
zonecfg:zone01> end

How to assign a ZFS volume to zone ?

To assign a ZFS volume to non-global zone :
global # zonecfg -z zone01
zonecfg:zone1> add device
zonecfg:zone1:device> set match=/dev/zvol/dsk/rpool/datavol
zonecfg:zone1:device> end
zonecfg:zone1> verify
zonecfg:zone1> commit
zonecfg:zone1> exit

How to configure shared/exclusive IP address to a zone ?

We can either give an exclusive IP using a dedicated interface to a non-global zone or use an existing interface in the global zone to share it with the non-global zone. When we configure an exclusive IP we have to configure IP address inside of the non-global zone and not during the configuration.
a. Exclusive IP
zonecfg:my-zone> set ip-type=exclusive
zonecfg:zone01> add net
zonecfg:zone01:net> set physical=hme0
NOTE: No need to specify IP here you can control everything from inside of the non-global zone
b. Shared IP
In this case zone uses a shared interface which is already plumbed and being used in the global zone.
zonecfg:zone01> add net
zonecfg:zone01:net> set address=192.168.1.2
zonecfg:zone01:net> set physical=hme0
zonecfg:zone01:net> set defrouter=10.0.0.1   [optional]
zonecfg:zone01:net> end

How to assign a physical disk to a non-global zone ?

We can assign an entire disk to a non-global zone :
zonecfg:zone01> add device
zonecfg:zone01:device> set match=/dev/rdsk/c0t1d0
zonecfg:zone01:device> end

How to add a loopback filesystem to zone ?

To assign a loopback filesystem to the non-global zone :
zonecfg:zone01> add fs
zonecfg:zone01:fs> set dir=/usr/local
zonecfg:zone01:fs> set special=/opt/zones/my-zone/local
zonecfg:zone01:fs> set type=lofs
zonecfg:zone01:fs> end

How to assign a UFS file system to a non-global zone ?

To assign a UFS filesystem to the non-global zone :
zonecfg:zone01> add fs
zonecfg:zone01:fs> set dir=/data01
zonecfg:my-zone01:fs> set special=/dev/dsk/c1t1d0s0
zonecfg:my-zone01:fs> set raw=/dev/rdsk/c1t1d0s0
zonecfg:my-zone01:fs> add options [logging, nosuid]    (optional)
zonecfg:my-zone01:fs> end

What are the different ways to assign CPU and memory resources to zones ?

Refere the below posts for detailed steps on allocating CPU/memory resources :

Advanced

Can we move zones between systems ?

Yes, we can move zones between systems. For this we halt the zone, detach it, and then reattach it to another system.

How to change hostname/zone-name or IP address in Non-global zone ?

1. Login into the zone and edit the below files :
/etc/inet/ipnodes
/etc/inet/hosts
2. From the Global zone change the zone’s configuration :
root@global # zonecfg -z my-zone
root@global # zonecfg:my-zone> set zonename=new_name
root@global # zonecfg:newzone> commit
root@global # zonecfg:newzone> set address=x.x.x.x  (where x.x.x.x is the new address)
root@global # zonecfg:newzone> end
root@global # zonecfg:newzone> verify
root@global # zonecfg:newzone> commit
root@global # zonecfg:newzone> exit
3. Reboot the zone
root@global # zoneadm -z my-zone reboot

What are the general guidelines to do live upgrade on system with non-global zones ?

1. Make sure when lucreate is running, there is no patch or packaging operation running within any non-global zone on the system. This may cause the non-global zone in Alternate Boot environment (ABE) to have files out of sync.
2. No change of state for all non-global zones during the live upgrade process. For example a halted zone can not be booted or a active zone can not be halted until the lucreate is complete.
3. Similarly if a ABE is mounted via lumount, you can not change the zone state for any non-global zone.
4. All non-global zones must be booted at least once prior to running lucreate. Running lucreate on a system where there are non-global zones in the “installed” state that have never been booted will result in various warning messages such as the following:
Making boot environment  bootable.
login: login allowed only to running zones (test_sparse_oyster is 'installed').
5. All branded solaris 8 and solaris 9 zones must be halted before the lucreate command is executed.